1 概述
上次全网第一篇分享MidasAPI的文章被Midas工作人员转发,万分感激!各位粉丝朋友也点赞转发,阅读量一破目标1900,应粉丝朋友的强烈要求,再续一篇python版本的。
学习之前,可以先回看下上一篇的Json语法,同时也要解决Python的环境配置问题,我用的是Anaconda自带的request包,没有的话可以按文档来安装。
MIDAS GEN API中文帮助文档(MIDAS 李博士提供):https://www.wolai.com/tJGVDF5ohSANYF5BWniae4
2 上次培训的视频及PPT
我在视频里基本讲了一遍,因时间有限,可能还是有比较多未讲清楚,欢迎大家留言。
这里再次说下python写json的优势。
比如MIDAS的梁单元信息,json格式如下:
{"Assign" : {
   1 : {
        "ITEMS" : [
            {
                "ID":1,
                "CONSTRAINT" : "1111000"
            }
        ]
    },
    7 : {
        "ITEMS" : [
            {
                "ID":1,
                "CONSTRAINT" : "0111000"
            }
        ]
    }
}}
我采用python来写,我可以直接写成下面这样。
# 创建边界条件
cons_json = {"Assign" : {
   1 : {
        "ITEMS" : [
            {
                "ID":1,
                "CONSTRAINT" : "1111000"
            }
        ]
    },
    7 : {
        "ITEMS" : [
            {
                "ID":1,
                "CONSTRAINT" : "0111000"
            }
        ]
    }
}}
可以看出几乎是一样的,当然python对于代码的收进格式的有要求的,这个倒没什么,可以改动。其他几乎完全一样。
所以采用python来进行midas api的开发是非常酸爽的,也非常实用。
3 先写一个请求函数
请求函数是基于request包来写的,具体代码如下:
# -*- coding: utf-8 -*-
"""
Created on Sat May 11 12:08:44 2024

@author: idealzeng
>>公众号/B站/小红书/抖音 搜   “以诗为码”
>>网站:www.structurevspoem.com
>> 微信
"""

##以下代码在MIDAS API官方文档和MIDAS 李工帮助下完成,在此表示感谢。
##引入第三方库

import requests
from requests.exceptions import JSONDecodeError, RequestException
❏request通用请求函数 :
# MIDAS API请求的函数
def MidasAPI(method, command, body=None):
    base_url = "https://moa-engineers.midasit.cn:443/gen"##填写这个服务器网址,其他都被关闭了。注意下,如果是rhino或其他程序,需要打开他们的访问外网的端口,确保链接外网
    mapi_key = "eyJ1ciI6InplbmdtaW5nIiwicGciOiJnZW4iLCJjbiI6ImZIRHJsTEl2UVEifQ.392b3f9b27751776b1a4e468ca702be96ad604e17e2c4300c22bd78b1ef4e507"##大家填写自己的key
    url = base_url + command
    headers = {
        "Content-Type": "application/json",
        "MAPI-Key": mapi_key
    }
    try:
        if method == "POST":
            response = requests.post(url=url, headers=headers, json=body)
        elif method == "PUT":
            response = requests.put(url=url, headers=headers, json=body)
        elif method == "GET":
            response = requests.get(url=url, headers=headers)
        elif method == "DELETE":
            response = requests.delete(url=url, headers=headers)

        print(method, command, response.status_code)

        try:
            return response.json()
        except JSONDecodeError:
            print("Failed to parse JSON. Response content:")
            print(response.text)
            return None

    except RequestException as e:
        print(f"An error occurred: {e}")
        return None
4 python调用API建模
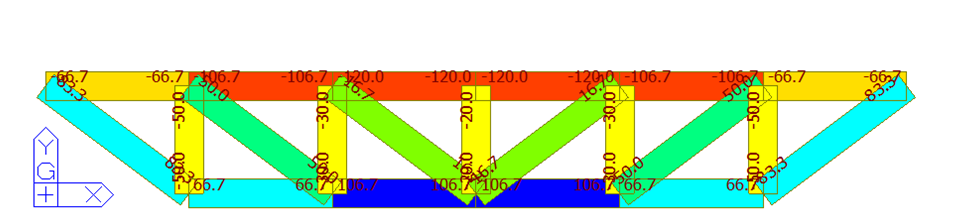
代码还是培训的那个平面桁架,如下图所示。

# 设置结构类型,为XY平面的
styp_json={"Assign": {
        "1": {
            "STYP": 3,#XY平面
            "MASS": 1,
            "SMASS": 1,
            "bMASSOFFSET": True,
            "bSELFWEIGHT": True,
            "GRAV": 9.806,
            "TEMP": 0.0,
            "bALIGNBEAM": True,
            "bALIGNSLAB": True,
            "bROTRIGID": False
        }
    }}

# 单位设置
unit_dist = "M"     # M, CM, MM, IN, FT
unit_force = "KN"   # KN, N, KGF, TONF, LBF, KIPS
# Input Data
#确定一个截面高度,这个截面足够刚度就好
height : float  = 1.0
width : float  = 0.8

# 材料数据
mat_standard = "GB50017-17(S)"
mat_grade = "Q355"
# ID (integer)
material_ID : int = 1
section_ID : int = 1

# 单位的json语句
unit_json = {"Assign" : {
    "1" : {
        "DIST" : unit_dist,
        "FORCE" : unit_force
    }
}}

# 材料的json语句
matl_json = {"Assign" : {
    material_ID : {
        "TYPE" : "STEEL",
        "NAME" : mat_grade,
        "PARAM" : [
            {
                "P_TYPE":1,
                "STANDARD" : mat_standard,
                "DB" : mat_grade
            }
        ]
    }
}}

#截面的json语句
sect_json = {"Assign" : {
    section_ID : {
        "SECTTYPE" : "DBUSER",
        "SECT_NAME" : "Rect",
        "SECT_BEFORE" : {
            "USE_SHEAR_DEFORM" : True,
            "SHAPE": "SB",
            "DATATYPE": 2,
            "SECT_I": {
                "vSIZE" : [height, width]
            }
        }
    }
}}

# 节点的json
node_json = {"Assign" : {}}
for i, joint in enumerate(joints):
    node_json["Assign"][i+1] = {
        "X" : joints[i][0],
        "Y" : joints[i][1],
        "Z" : 0.0
    }

# 创建单元
elem_json = {"Assign" : {}}
for i in range(len(members)):
    elem_json["Assign"][1 + i] = {
        "TYPE" : "TRUSS",
        "MATL" : material_ID,
        "SECT" : section_ID,
        "NODE" : [members[i][0], members[i][1]]
    }

# 创建边界条件
cons_json = {"Assign" : {
   1 : {
        "ITEMS" : [
            {
                "ID":1,
                "CONSTRAINT" : "1111000"
            }
        ]
    },
    7 : {
        "ITEMS" : [
            {
                "ID":1,
                "CONSTRAINT" : "0111000"
            }
        ]
    }
}}

# 创建荷载工况
load_case_name = ["DL", "SIDL"]
load_case_desc = ["Dead Load", "Super Imposed Dead Load"]
stld_json = {"Assign" : {}}
for i in range(len(load_case_name)) :
    stld_json["Assign"][i + 1] = {
        "NAME" : load_case_name[i],
        "TYPE" : "USER",
        "DESC" : load_case_desc[i],
    }

# 创建自重荷载
# bodf_json = {"Assign" : {
#     "1" : {
#         "LCNAME" : load_case_name[0],
#         "GROUP_NAME": "",
#         "FV" :[
#             0,
#             0,
#             -1
#         ]
#     }
# }}

load_NodeList=[2,3,4,5,6]

add_vertical_load : float = -20.0

# 施加节点荷载
cnld_json = {"Assign" : {}}
for i in range(len(load_NodeList)) :
    cnld_json["Assign"][i + 2] = {
        "ITEMS" :[
            {
                "ID" : load_NodeList[i],
                "LCNAME" : load_case_name[0],
                "GROUP_NAME": "",
                "FX": 0,
                "FY": add_vertical_load,
                "FZ": 0,
                "MX": 0,
                "MY": 0,
                "MZ": 0
            }
        ]
    }

# 创建荷载工况组合
# load_factor = [1.2, 1.5]
# lcom_gen_json = {"Assign" : {
#     "1" : {
#         "NAME" : "Comb1",
#         "ACTIVE" : "ACTIVE",
#         "iTYPE" : 0,
#         "vCOMB" :[
#             {
#                 "ANAL" : "ST",
#                 "LCNAME" : load_case_name[0],
#                 "FACTOR" : load_factor[0]
#             },
#             {
#                 "ANAL" : "ST",
#                 "LCNAME" : load_case_name[1],
#                 "FACTOR" : load_factor[1]
#             }
#         ]
#     }
# }}

# 具体的Json数据传输
##创建一个新的MIDAS project模型
file_res = MidasAPI("POST", "/doc/new", {})
# 设置结构类型
Structtype_res = MidasAPI("PUT", "/db/styp", styp_json)
# 设置单位
unit_res = MidasAPI("PUT", "/db/unit", unit_json)
# 定义材料
matl_res = MidasAPI("POST", "/db/matl", matl_json)
# 定义截面
sect_res = MidasAPI("POST", "/db/sect", sect_json)
# 定义节点
node_res = MidasAPI("POST", "/db/node", node_json)
# 定义单元
elem_res = MidasAPI("POST", "/db/elem", elem_json)
# 定义约束
cons_res = MidasAPI( "POST", "/db/cons", cons_json)
# 定义荷载工况
stld_res = MidasAPI("POST", "/db/stld", stld_json)
# 定义荷载
bmld_res = MidasAPI("POST", "/db/cnld", cnld_json)
5 API调用MIDAS GEN计算及生成图片
调用计算比较简单,分析之前,需要保存模型。想一想用python调用python-docx库写word,然后插入图片及图表,可以自动生成分析报告,大有可为。
## 分析之前,需要保存模型
## 另存到指定路径
mgbpath = "E:\\Projects\\2024years\\20240417MidasAPI_Report\\Demo\\2D_Truss_py.mgb"

saveasjson={"Argument":mgbpath}

saveasMgb = MidasAPI("POST", "/doc/saveas", saveasjson)

##运行分析

runAnalysis = MidasAPI("POST", "/doc/Anal", {})

##图片保存路径
picpath="E:\\Projects\\2024years\\20240417MidasAPI_Report\\Demo\\Truss_Force.jpg"

##显示杆件轴力图,并截图保存图片至指定路径
savePicjson ={
    "Argument": {
        "SET_MODE": "post",
        "EXPORT_PATH": picpath,
        "ANGLE": {
            "HORIZONTAL": 0,
            "VERTICAL": 90
        },
        "ACTIVE": {
            "ACTIVE_MODE": "All"
        },
        "RESULT_GRAPHIC": {
            "CURRENT_MODE": "truss forces",
            "LOAD_CASE_COMB": {
                "TYPE": "ST",
                "NAME": "DL"
            },
            "COMPONENTS": {
                "PART": "total",
                "COMP": "All"
            },
            "TYPE_OF_DISPLAY": {
                "CONTOUR": {
                    "OPT_CHECK": True
                },
                "VALUES": {
                    "OPT_CHECK": True
                },
                "LEGEND": {
                    "OPT_CHECK": True
                },
                "DEFORM": {
                    "OPT_CHECK": True
                }
            }
        }
    }
}

runAnalysis = MidasAPI("POST", "/view/capture", savePicjson)
最后输出结果的效果也还不错,如下图所示。
6 写在最后
生命的意义在于折腾,全网微信公众号第2篇关于MIDAS API就介绍到这里了,下次再用真实模型测试下运行效率及其他好玩的东西。这里给读者们道个歉,最近做什么都没太多精力,看阅读量再写下一篇吧。
————————————————————————ENGLISH——————————————————————————————-
1 Overview
The first article sharing MidasAPI that I posted online was forwarded by Midas staff, for which I am extremely grateful! My dear followers also liked and shared it, and the readership exceeded the target of 1900. In response to the strong demand from my followers, I am continuing with a Python version.
Before diving into the learning process, you might want to review the JSON syntax from the previous article and also address the Python environment configuration issue. I am using the request package that comes with Anaconda. If you don’t have it, you can install it according to the documentation.
MIDAS GEN API Chinese Help Document (provided by Dr. Li of MIDAS): midas Gen API 使用说明
2 Last Training’s Video and PPT
I basically went through it all in the video. Due to time constraints, there might still be quite a few things that were not explained clearly. I welcome everyone to leave comments.
Here, I will reiterate the advantages of writing JSON with Python. For example, the beam element information of MIDAS is in the following JSON format:
{
    "Assign": {
        1: {
            "ITEMS": [
                {
                    "ID": 1,
                    "CONSTRAINT": "1111000"
                }
            ]
        },
        7: {
            "ITEMS": [
                {
                    "ID": 1,
                    "CONSTRAINT": "0111000"
                }
            ]
        }
    }
}
With Python, I can write it directly like this:
#Create boundary conditions
cons_json = {
    "Assign": {
        1: {
            "ITEMS": [
                {
                    "ID": 1,
                    "CONSTRAINT": "1111000"
                }
            ]
        },
        7: {
            "ITEMS": [
                {
                    "ID": 1,
                    "CONSTRAINT": "0111000"
                }
            ]
        }
    }
}
It can be seen that they are almost identical. Of course, Python has requirements for code indentation, but that’s not a big issue and can be modified. Almost everything else is the same. So, using Python for MIDAS API development is very enjoyable and practical.
3 Write a Request Function First
The request function is based on the request package, and the specific code is as follows:
# -*- coding: utf-8 -*-
"""
Created on Sat May 11 12:08:44 2024

@author: idealzeng
>> WeChat Official Account/Bilibili/Xiaohongshu/Douyin search for "Yi Shi Wei Ma"
>> Website: www.structurevspoem.com
>> WeChat
"""

# The following code was completed with the help of the official MIDAS API documentation and assistance from Mr. Li of MIDAS. Thanks are due to them.
# Import third-party libraries

import requests
from requests.exceptions import JSONDecodeError, RequestException
❏General request function using requests:
# MIDAS API request function
def MidasAPI(method, command, body=None):
    base_url = "https://moa-engineers.midasit.cn:443/gen"  # Fill in this server address; all others are closed. Note that if you are using Rhino or other programs, you need to open their ports for external access to ensure the connection to the external network.
    mapi_key = "eyJ1ciI6InplbmdtaW5nIiwicGciOiJnZW4iLCJjbiI6ImZIRHJsTEl2UVEifQ.392b3f9b27751776b1a4e468ca702be96ad604e17e2c4300c22bd78b1ef4e507"  # Fill in your own key
    url = base_url + command
    headers = {
        "Content-Type": "application/json",
        "MAPI-Key": mapi_key
    }
    try:
        if method == "POST":
            response = requests.post(url=url, headers=headers, json=body)
        elif method == "PUT":
            response = requests.put(url=url, headers=headers, json=body)
        elif method == "GET":
            response = requests.get(url=url, headers=headers)
        elif method == "DELETE":
            response = requests.delete(url=url, headers=headers)

        print(method, command, response.status_code)

        try:
            return response.json()
        except JSONDecodeError:
            print("Failed to parse JSON. Response content:")
            print(response.text)
            return None

    except RequestException as e:
        print(f"An error occurred: {e}")
        return None
4 Python API Modeling
The code is still the planar truss from the training, as shown in the figure below. http://www.structurevspoem.com/wp-content/uploads/2025/05/image-20240529121029367.png
# Set the structure type to XY plane
styp_json = {
    "Assign": {
        "1": {
            "STYP": 3,  # XY plane
            "MASS": 1,
            "SMASS": 1,
            "bMASSOFFSET": True,
            "bSELFWEIGHT": True,
            "GRAV": 9.806,
            "TEMP": 0.0,
            "bALIGNBEAM": True,
            "bALIGNSLAB": True,
            "bROTRIGID": False
        }
    }
}

# Unit settings
unit_dist = "M"     # M, CM, MM, IN, FT
unit_force = "KN"   # KN, N, KGF, TONF, LBF, KIPS

# Input Data
# Determine a section height, which should be sufficiently rigid
height: float = 1.0
width: float = 0.8

# Material data
mat_standard = "GB50017-17(S)"
mat_grade = "Q355"
# ID (integer)
material_ID: int = 1
section_ID: int = 1

# Unit JSON statement
unit_json = {
    "Assign": {
        "1": {
            "DIST": unit_dist,
            "FORCE": unit_force
        }
    }
}

# Material JSON statement
matl_json = {
    "Assign": {
        material_ID: {
            "TYPE": "STEEL",
            "NAME": mat_grade,
            "PARAM": [
                {
                    "P_TYPE": 1,
                    "STANDARD": mat_standard,
                    "DB": mat_grade
                }
            ]
        }
    }
}

# Section JSON statement
sect_json = {
    "Assign": {
        section_ID: {
            "SECTTYPE": "DBUSER",
            "SECT_NAME": "Rect",
            "SECT_BEFORE": {
                "USE_SHEAR_DEFORM": True,
                "SHAPE": "SB",
                "DATATYPE": 2,
                "SECT_I": {
                    "vSIZE": [height, width]
                }
            }
        }
    }
}

# Node JSON
node_json = {"Assign": {}}
for i, joint in enumerate(joints):
    node_json["Assign"][i + 1] = {
        "X": joints[i][0],
        "Y": joints[i][1],
        "Z": 0.0
    }

# Create elements
elem_json = {"Assign": {}}
for i in range(len(members)):
    elem_json["Assign"][1 + i] = {
        "TYPE": "TRUSS",
        "MATL": material_ID,
        "SECT": section_ID,
        "NODE": [members[i][0], members[i][1]]
    }

# Create boundary conditions
cons_json = {
    "Assign": {
        1: {
            "ITEMS": [
                {
                    "ID": 1,
                    "CONSTRAINT": "1111000"
                }
            ]
        },
        7: {
            "ITEMS": [
                {
                    "ID": 1,
                    "CONSTRAINT": "0111000"
                }
            ]
        }
    }
}

# Create load cases
load_case_name = ["DL", "SIDL"]
load_case_desc = ["Dead Load", "Super Imposed Dead Load"]
stld_json = {"Assign": {}}
for i in range(len(load_case_name)):
    stld_json["Assign"][i + 1] = {
        "NAME": load_case_name[i],
        "TYPE": "USER",
        "DESC": load_case_desc[i],
    }

# Create self-weight load
# bodf_json = {
#     "Assign": {
#         "1": {
#             "LCNAME": load_case_name[0],
#             "GROUP_NAME": "",
#             "FV": [
#                 0,
#                 0,
#                 -1
#             ]
#         }
#     }
# }

load_NodeList = [2, 3, 4, 5, 6]
add_vertical_load: float = -20.0

# Apply nodal loads
cnld_json = {"Assign": {}}
for i in range(len(load_NodeList)):
    cnld_json["Assign"][i + 2] = {
        "ITEMS": [
            {
                "ID": load_NodeList[i],
                "LCNAME": load_case_name[0],
                "GROUP_NAME": "",
                "FX": 0,
                "FY": add_vertical_load,
                "FZ": 0,
                "MX": 0,
                "MY": 0,
                "MZ": 0
            }
        ]
    }

# Create load case combinations
# load_factor = [1.2, 1.5]
# lcom_gen_json = {
#     "Assign": {
#         "1": {
#             "NAME": "Comb1",
#             "ACTIVE": "ACTIVE",
#             "iTYPE": 0,
#             "vCOMB": [
#                 {
#                     "ANAL": "ST",
#                     "LCNAME": load_case_name[0],
#                     "FACTOR": load_factor[0]
#                 },
#                 {
#                     "ANAL": "ST",
#                     "LCNAME": load_case_name[1],
#                     "FACTOR": load_factor[1]
#                 }
#             ]
#         }
#     }
# }

# Specific JSON data transmission
## Create a new MIDAS project model
file_res = MidasAPI("POST", "/doc/new", {})
# Set structure type
Structtype_res = MidasAPI("PUT", "/db/styp", styp_json)
# Set units
unit_res = MidasAPI("PUT", "/db/unit", unit_json)
# Define material
matl_res = MidasAPI("POST", "/db/matl", matl_json)
# Define section
sect_res = MidasAPI("POST", "/db/sect", sect_json)
# Define nodes
node_res = MidasAPI("POST", "/db/node", node_json)
# Define elements
elem_res = MidasAPI("POST", "/db/elem", elem_json)
# Define constraints
cons_res = MidasAPI("POST", "/db/cons", cons_json)
# Define load cases
stld_res = MidasAPI("POST", "/db/stld", stld_json)
# Define loads
bmld_res = MidasAPI("POST", "/db/cnld", cnld_json)
5 API Call for MIDAS GEN Calculation and Image Generation
Calling the calculation is relatively straightforward. Before running the analysis, the model needs to be saved. Consider using the python-docx library to write a Word document in Python, then insert images and charts to automatically generate an analysis report. This has great potential.
## Before running the analysis, the model needs to be saved
## Save to a specified path
mgbpath = "E:\\Projects\\2024years\\20240417MidasAPI_Report\\Demo\\2D_Truss_py.mgb"

saveasjson = {"Argument": mgbpath}

saveasMgb = MidasAPI("POST", "/doc/saveas", saveasjson)

## Run the analysis
runAnalysis = MidasAPI("POST", "/doc/Anal", {})

## Image save path
picpath = "E:\\Projects\\2024years\\20240417MidasAPI_Report\\Demo\\Truss_Force.jpg"

## Display the axial force diagram of the members and save the image to the specified path
savePicjson = {
    "Argument": {
        "SET_MODE": "post",
        "EXPORT_PATH": picpath,
        "ANGLE": {
            "HORIZONTAL": 0,
            "VERTICAL": 90
        },
        "ACTIVE": {
            "ACTIVE_MODE": "All"
        },
        "RESULT_GRAPHIC": {
            "CURRENT_MODE": "truss forces",
            "LOAD_CASE_COMB": {
                "TYPE": "ST",
                "NAME": "DL"
            },
            "COMPONENTS": {
                "PART": "total",
                "COMP": "All"
            },
            "TYPE_OF_DISPLAY": {
                "CONTOUR": {
                    "OPT_CHECK": True
                },
                "VALUES": {
                    "OPT_CHECK": True
                },
                "LEGEND": {
                    "OPT_CHECK": True
                },
                "DEFORM": {
                    "OPT_CHECK": True
                }
            }
        }
    }
}

runAnalysis = MidasAPI("POST", "/view/capture", savePicjson)
6 Final Words
The meaning of life lies in折腾 (striving and exploring). This is the second article on MIDAS API on WeChat Public Platform. I will stop here for now. Next time, I will test the running efficiency and other interesting aspects with a real model. I apologize to my readers for not having much energy lately. I will consider writing the next article based on the readership.